

Most traders know what a gap is. Far fewer know what to do when the gap actually shows up on their chart and even fewer know how to tell the good ones from the ones that will blow up their account.
This guide covers the gap and snap trading strategy from the ground up: what it is, why it works, exactly how to set it up, and how to read the candlestick signal that makes the whole thing click. By the end, you’ll have a repeatable system for finding these plays every week.
No indicators needed. No fancy software. Just price action and a disciplined setup.
What Is the Gap and Snap Trading Strategy?
The gap and snap is a short-term trading tactic built around one idea: when a stock has already been hammered down, gaps even lower on the open, and then rallies back to fill that gap, the resulting move can be explosive.
Buyers who want to buy “cheap” get their wish then get burned when the stock keeps dropping. Eventually, the sellers run out. The stock gaps one final time in their direction, looks absolutely awful on the news, and then snaps violently back the other way.
That snap is what you’re trading.
The setup targets a 1-to-2-day window, which puts it in the category of short-term swing trading. Positions are held no longer than 3 trading days. Stop losses are defined before entry. Targets are set in advance.
This is one of the most consistent setups available to retail traders because it’s driven entirely by human psychology fear, panic selling, and the inevitable exhaustion that follows any overdone move.
The Psychology Behind the Play
Before getting into the mechanics, it helps to understand why this works.
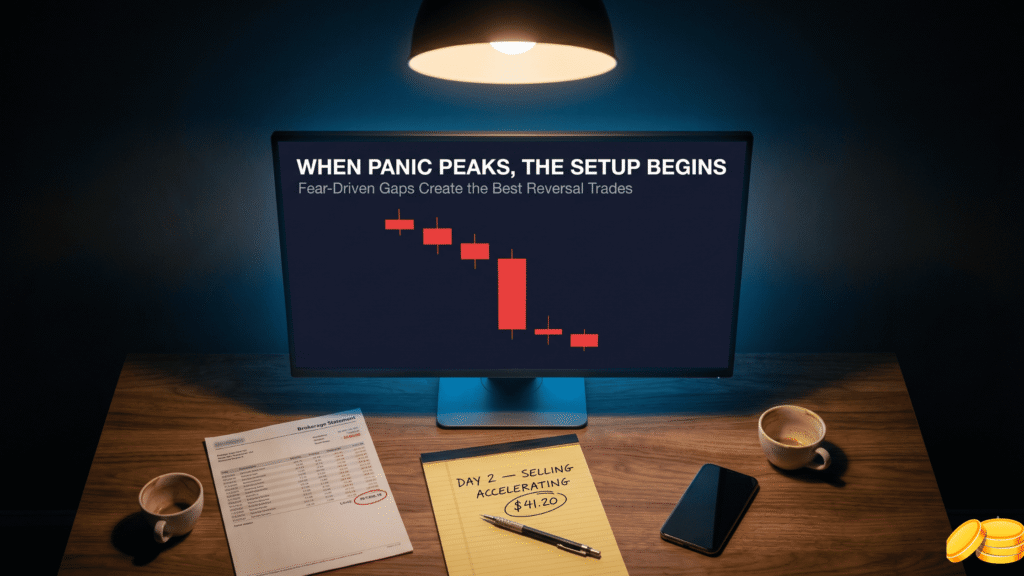
Markets are made of people. Behind every buy button and sell button is a human being feeling something — greed, fear, hope, or pain. The gap and snap strategy specifically target the moment when fear has peaked and sellers are exhausted.
Think about what happens when a stock gets bad news overnight.
Traders who held the stock come home, see it down 8% in after-hours trading, and panic. They place market sell orders for the open. Market makers who are the “buyer of last resort” receive these flood orders and do what any rational actor would do: they push the price as low as possible before they’re forced to absorb those shares.
That forced gap-down open is your setup. The stock opens at a price that’s artificially depressed by the flood of fear-based sell orders. When that pressure clears, there’s nobody left to sell. And when there’s nobody left to sell, even modest buying pressure causes a sharp move up.
The rally that fills the gap is your profit.
The One Candlestick You Need to Know First
The gap and snap setup has a specific candlestick requirement that most guides never mention. Without understanding this candle, you’ll misread half the setups you see.
It’s called the wide-range bar with minimal tails sometimes called the 20/20 bar in technical trading circles.
Here’s what it looks like:
- The candle body is significantly larger than recent bars on that chart
- The wicks (or tails) make up 20% or less of the total bar length
- The candle closes at or very near its extreme (either the high or the low)
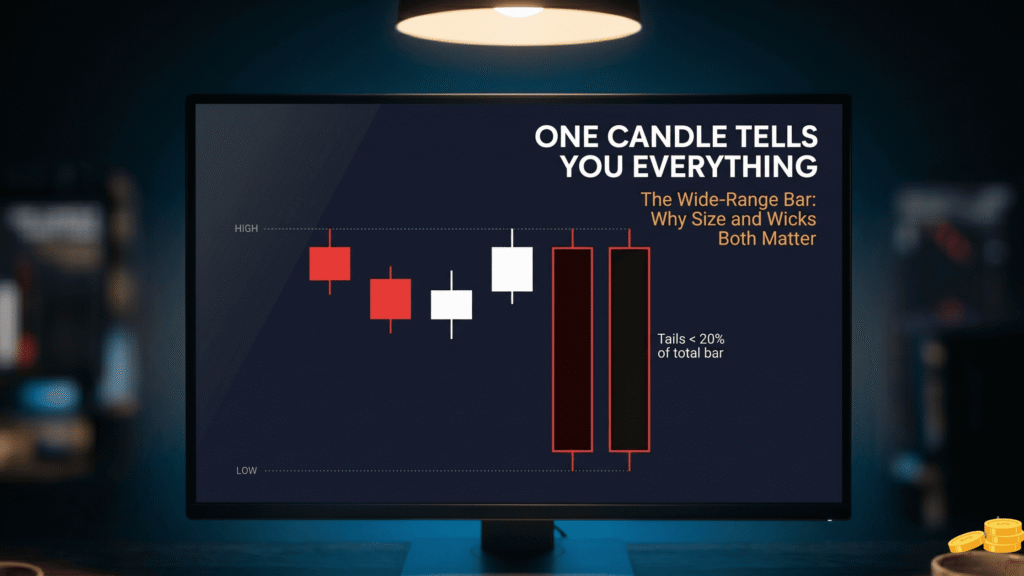
When a bearish version of this bar forms long black body, close near the low, tiny wicks it tells you one thing: the bears completely dominated that session. Sellers controlled the entire day from open to close. There was no pushback.
Why does that matter for the gap and snap?
Because a stock that has already produced 2 or more consecutive down days, with the final day being a wide-range bearish bar closing at its lows, has probably exhausted the majority of its sellers. Most of the people who wanted out have already gotten out.
The next move down the gap is the last gasp.
Bullish vs. Bearish Version
The bearish wide-range bar (needed for the bullish gap and snap setup) closes near its low with the open near the high. Fear dominated the entire session.
The bullish version (used for bearish setups, which we’ll cover separately) is the opposite the stock opens near the low and closes near the high. Greed dominated.
The key read: when you see a wide, dominant candle with tiny tails, you’re watching exhaustion in one direction and potentially a reversal incoming.
Setting Up the Gap and Snap Play
Here are the exact conditions you need before even considering an entry.
Step 1: Find the multi-day pain
You need a minimum of 2 consecutive down bars. The more the better 3 or 4 days of selling makes the setup stronger. The idea is that sellers have been grinding this stock down and accumulating pain for multiple days.
If you only have 1 red day, skip it. One day of selling is not exhaustion. Two or more is a different story.
Step 2: Confirm the bearish wide-range bar
The final day in that sequence the last red candle before the gap needs to be a wide-range bearish bar. Long body. Close near the day’s low. Tails under 20% of total bar length.
This bar is telling you the selling accelerated at the end. Pain intensified. People panicked on that last day.
That panic is what sets up tomorrow’s gap.
Step 3: Wait for the gap down
On the next morning, the stock needs to open at least 50 cents below the prior day’s close. This gap is critical it creates the “void” on the chart that has to be filled.
Without the gap, there’s no setup. You’re just looking at a declining stock.
Step 4: Watch for the snap back
This is the entry trigger. After the gap-down open, watch to see if the stock can rally upward and fill that gap. You’re not buying at the open. You’re waiting to see that buyers are actually stepping in with conviction.
The specific entry: buy the stock 5 to 10 cents above the high of the prior day’s wide-range bar, once the stock has shown the strength to begin filling the gap.
This entry point filters out stocks that simply drift higher for a few minutes before rolling over again. You need to see the snap — real buying pressure, not a dead cat bounce.
Placing Your Stop Loss
This is where most traders get it wrong. They take the trade without defining exactly where they’re wrong.
For the gap and snap, your stop loss goes 5 to 10 cents below the current day’s low. Not the prior day’s low. The day you enter, whatever low the stock prints during that session that’s your line.
The logic is simple: if the stock filled the gap, showed buying pressure, triggered your entry, and then breaks back below the day’s low, the thesis is broken. The sellers came back. Get out.
The stop is tight enough to control risk, and wide enough to let the trade breathe through normal intraday noise.
One more thing worth repeating: never skip the stop loss. The gap and snap often works because the stock makes a large move. When it goes against you, it can go hard. A missed stop on this setup is not a small loss.

Setting Your Target
Here’s something refreshing: the target for this setup is simple.
For a stock trading around $30, you’re looking for roughly $2 in profit. That’s your baseline target.
The hard rule: if you haven’t hit your profit target by the morning of the third trading day, you close the position regardless. No exceptions. No “let it ride.” Day 3 morning, you’re out.
So you have 3 possible exits:
- You get stopped out (controlled loss)
- You hit your $2 target (profit)
- Day 3 arrives and you exit at whatever price (discipline)
This 3-outcome structure is what keeps the strategy from becoming a “hope trade.” You define the entire trade before you enter it.
Why Market Makers Matter Here
One thing that separates this strategy from generic “buy the dip” thinking is the awareness of what’s actually happening on the other side of the trade.
When a stock gaps down on bad news, market makers are often forced to absorb the flood of sell orders at the open. They’re the buyer of last resort by design. But they’re not charitable they use their position to force the opening price as low as possible, absorbing shares at the cheapest price they can get.
This mechanic creates something useful: the gap-down low is often set not by genuine valuation, but by the forced mechanics of order flow.
When the market makers have finished absorbing those sell orders, the artificial downward pressure lifts. Professional buyers who recognize the exhaustion step in. The stock snaps back.
You’re trading with the professionals, not against them.
The confirmation trigger waiting for the stock to fill the gap before entering is what keeps you from buying a stock that simply continues lower. If the snap doesn’t happen, you never enter. You wait for the next setup.
The Gap and Crap: The Opposite Play
The gap and crap is the bearish mirror of the gap and snap. And it’s equally powerful.
Here’s the setup: a stock has had 2 or more consecutive up days, with the final day being a bullish wide-range bar long white body, close near the high, tiny tails. The bulls dominated that entire session.
The next morning, the stock gaps up. It opens higher. The news is good. Maybe there was an earnings beat, an analyst upgrade, or viral social chatter about the stock.
And then it falls apart.
Here’s why. After multiple days of buying, with the last day being a wide-range bullish bar where buyers already committed heavily, there are very few buyers left to sustain the gap. All the bullets have been fired. When the excitement of the gap-up open fades and no new buyers arrive to push it higher, the stock starts to drift.
Then it slides. Then it flushes.
That flush is the gap and crap.
The bearish entry: the stock gaps up, fails to sustain the move, and begins rolling back through the prior day’s closing price. You’re shorting into that rollover.
Stop: 5 to 10 cents above the current day’s high.
Target: $2 move lower for a $30 stock, or close by day 3.
The gap and crap work for the same reason the gap and snap works exhaustion of the dominant side, followed by a sharp reversal. The only difference is which side is exhausted.
Reward-to-Risk: The Math That Makes This Work Long-Term
Trading is a probability game. Individual trades will win and lose. What matters is whether your winners are larger than your losers over time.
The gap and snap setup, when done correctly, naturally produces favorable reward-to-risk ratios. You’re risking roughly 30 to 50 cents on a stop while targeting $2 in profit. That’s a 4:1 ratio on a well-constructed trade.
At 4:1, you only need to be right 25% of the time to break even. In practice, a competent trader running this setup can hit a higher win rate than that.
But here’s the discipline piece: you can only achieve that reward-to-risk ratio if you actually take your stop loss when it’s hit. A trader who wins 6 out of 10 gap and snap trades but lets one loser run to $5 down has worse results than a trader who wins 4 out of 10 and takes all stops properly.
Share sizing matters too. If your stop is 50 cents and you’re trading 2,000 shares, your max loss is $1,000 on that trade. Know that number before you enter. Size your position so that any single loss is a manageable percentage of your account typically 1-2%.

What Strong Setups Look Like vs. Weak Ones
Not every gap and snap setup is equal. Here’s how to grade them.
Stronger setups have:
- 3 or more days of consecutive selling before the gap (more exhaustion)
- High-volume selling on the final wide-range bar (confirms real panic, not just drift)
- The gap occurring after a stock was already in a broader downtrend (not in the middle of an uptrend — that’s a different animal)
- A clean fill of the gap before the entry trigger fires
- The setup occurring in a market that’s not in freefall context matters
Weaker setups have:
- Only 1 down day before the gap (not enough selling exhaustion)
- A small, modest gap under 50 cents is marginal for a $30 stock
- Low volume on the day of the setup (nobody’s paying attention)
- The entry trigger barely triggering a hesitant snap, not a decisive one
- A broader market in full panic mode (when the whole market is selling, gap setups fail more often)
One nuance worth noting: the gap and snap works best on stocks that move. A slow-moving utility stock gapping 50 cents is a different setup than a volatile tech stock gapping 50 cents. The same dollar move represents very different things depending on the stock’s typical daily range.
Always compare the gap size and the wide-range bar size to that stock’s average move. Visual context matters more than rigid dollar amounts.
Using Time Frames to Refine Your Entry
The gap and snap is primarily a daily chart setup. That’s where you identify the 2-day selloff, the wide-range bar, and the gap.
But once you have the setup identified, dropping to an intraday chart a 15-minute or 5-minute can help you time your entry more precisely.
What you’re looking for on the intraday chart:
- A consolidation period after the open (not immediate buying the stock needs to “find its footing”)
- A clear range forming in the first 30-60 minutes
- A breakout above that intraday range that corresponds with the snap back toward the gap
This intraday confirmation gives you a tighter entry point and often a tighter stop improving your risk-to-reward even further. The setup came from the daily chart. The precision came from the intraday chart.
Common Mistakes Traders Make With Gap Setups
Buying at the open. The open is the most dangerous time to enter. You don’t know yet if buyers are real. Wait for the snap.
Ignoring the wide-range bar requirement. A stock that dropped on low-volume modest red candles hasn’t exhausted sellers. The concentrated fear of a wide-range bar is the setup. Without it, you’re guessing.
Assuming all gaps fill. They don’t. Some stocks gap down and continue lower all day. The entry trigger waiting for the stock to begin filling the gap is what protects you from the gap that keeps going.
Holding past day 3. The trade has a time limit. After day 3, you’re no longer in a gap and snap trade. You’re in a hope trade. Close it.
Oversizing the position. Because this setup can have a wide stop by dollar amount, sizing must be calibrated to your account. 2,000 shares on a 75-cent stop is a $1,500 risk on one trade. Know your numbers.
Frequently Asked Questions
What’s the best stock to use for the gap and snap strategy?
Volatile stocks above $30 per share with meaningful average daily ranges tend to work best. Think active NASDAQ names, not sleepy value stocks. You want stocks where a $2 move is possible in 1-2 days. Low-float stocks can also produce explosive gap and snap moves, though they carry more risk due to thin liquidity.
Does the gap and snap work on ETFs?
It can, but ETFs tend to be less volatile than individual stocks. The gap and snap relies on emotional extremes panic selling and capitulation which is harder to find in a diversified fund. Individual stocks generate more concentrated fear and greed. That said, sector ETFs in market downturns can produce gap and snap setups.
How do I find gap and snap setups each morning?
Most trading platforms let you scan for stocks gapping down by a specific percentage or dollar amount in the premarket. Filter for stocks that have been in a downtrend for 2+ days and gapping down significantly. Then watch for the wide-range bar on the prior day. That narrows the field quickly.
What time frame works best?
The setup is defined on the daily chart. The entry is triggered intraday most traders use the 15-minute chart to time entry. You’re not scalping this. It’s a 1-to-3-day swing hold.
Can this be used in a bear market?
Yes, but be selective. In a bear market, gap and snap setups fail more often because the broader market selling pressure overwhelms individual stock setups. Stick to the strongest technical setups and consider using smaller position sizes during extended downtrends.
What’s the difference between a gap and snap and a gap and go?
They’re opposites. The gap and go is a momentum strategy the stock gaps up on strength and you buy the continuation. The gap and snap are a reversal strategy the stock gaps down on fear and you buy the reversal. They require completely different market conditions to set up correctly.
Putting It Together: A Real Walk-Through
Here’s how a gap and snap trade looks from start to finish, step by step.
Monday: Stock XYZ closes at $42 after a second consecutive down day. Monday’s candle is wide-range bearish opened at $44.50, closed at $41.80, with tiny tails. Volume was above average. Two down days in a row, with Monday being a clean exhaustion bar.
Tuesday morning: XYZ opens at $40.20. That’s a $1.60 gap below Monday’s close. The gap condition is met.
Watch list: You’re now watching XYZ closely. The question is: will buyers step in?
10:15 AM: XYZ has been consolidating between $40.00 and $40.50. Then it starts to move. It climbs through $41.00. You’re watching for it to clear the entry trigger 5 to 10 cents above Monday’s low of $41.80, so roughly $41.90.
10:32 AM: XYZ hits $41.95. Entry triggered. You buy.
Stop placed: Tuesday’s low so far is $39.90. Stop goes at $39.80.
Target: $2 gain from entry = $43.95. Or you exit Wednesday morning if target isn’t hit.
Tuesday close: XYZ closes at $43.20. You’re up $1.25 per share. Still in target not hit yet.
Wednesday morning: XYZ opens at $44.10. Your target is hit in the first 30 minutes. Exit at $43.95. Clean $2 gain.
That’s the gap and snap from setup to exit.
Building This Into Your Weekly Routine
The gap and snap isn’t something you hunt every day. It’s a setup you wait for. Most weeks you’ll find 2-5 candidates that are worth watching. Of those, maybe 1-2 will actually trigger a valid entry.
The routine that works:
- Sunday evening or Monday pre-market: scan for stocks in a 2+ day downtrend with significant gap-down potential based on news or earnings
- Weekday mornings (pre-market): check your watchlist for stocks gapping down 1%+ from the prior close
- At the open: observe — don’t trade immediately. Let the stock find its range
- 30-60 minutes in: look for the snap back developing. Wait for your entry trigger
- Entry, stop, target all set before you click buy
Discipline here beats intelligence every time. The trader who executes good setups consistently will outperform the trader who looks for clever shortcuts.
Why Trust This Framework
Price action doesn’t lie. Charts capture the aggregate behavior of every participant in that market every institution, every retail trader, every algorithm. The wide-range bar, the gap, the snap these aren’t patterns invented in a vacuum. They’re the footprints of real human fear and relief playing out in real time.
The gap and snap works because it’s grounded in something that doesn’t change: people panic, oversell, and then buyers step in when the selling is done. That’s been true in markets for over a century.
What changes is where the setup shows up and which stocks produce it. That’s why you still have to do the work scan the charts, qualify the setup, wait for the trigger. The framework is sound. The discipline is yours to bring.
Related Articles to Build Your Edge
- How to read Japanese candlestick charts for day trading
- Gap trading vs. momentum trading: which setup fits your style
- Stop loss strategies for short-term stock trades
- How to size positions based on stop distance and account risk
- The gap and crap setup: trading failed gap moves to the downside
Expert Tip
The hardest part of the gap and snap setup is resisting the urge to buy the gap down open itself. It looks so cheap. The stock that was $42 yesterday is now trading at $40.20 and your brain says “deal.”
But the market doesn’t care what something cost yesterday. The opening price is whatever buyers and sellers agree on today and if most of those sellers haven’t gotten out yet, the price can go a lot lower before it snaps.
Wait for the trigger. If the stock fills that gap and clears your entry level, you have evidence that real buying is happening. Without that evidence, you’re just guessing. One failed gap that keeps going lower will cost you more than three clean gap and snap profits put together.
The setup is patient. Be patient with it.